About Me

My photo
Hi, I am Georgina Cook! I blog because I relish in "sharing what I love". While there are so many things in life that I love (Cath Kidston, Galaxy chocolate, my husband's eyes, eBay, plucking my eyebrows (i just do...) , and Christmas morning), this blog will focus on my greater passions: crafting, going cool places with my hubby, shopping, decorating and every day life lessons.

Popular Posts

Labels

Powered by Blogger.

Search This Blog

Tuesday 20 September 2011

Craft Room Organizer

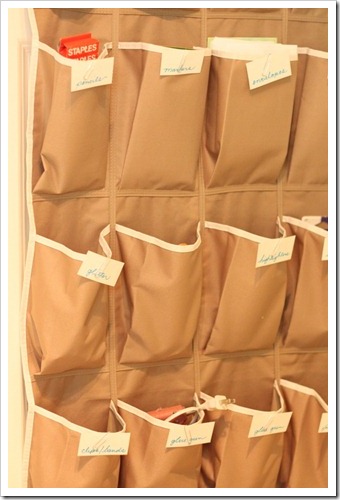
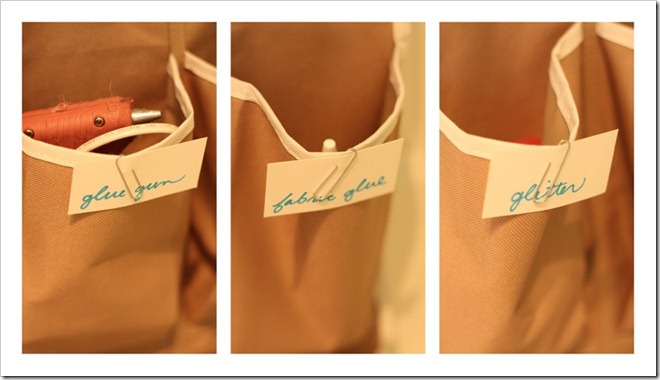
I bought this shoe holder to use as some handy storage space for my craft room!
IMG_4261


2011-09-141

Monday 19 September 2011


Ooooh! I am SO loving this fall season! Pumpkins are just great! I saw something similar to this in a super expensive shop.... I just thought Hey?! Georgina could easily make those for 99p! So that she did, Ha! That pumpkin was 99p.... I already have a pack of 100 tealights which were only £2.99. So, yeah! Did well for myself here. I love the way it looks. Naw! Just carve out a circle in the top of your pumpkin that is just the same size as the base of your tealight... and it will slot in nicely!

Colourful Cones!


These look really nice on my dresser! Go get some cones and paint them! 

Colourful Acorns!

I have a load of felt balls hanging around in my craft room that I got from ages ago. Time to make something for Fall out of them me thinks!

Felted Acorns

You will need:
Acorn Heads
Glue gun!


1. This is where some little children would come in very handy! Go find lots and lots of acorns. Take the green plant thingy out of the shell.
Felted Acorns

2.Glue gun the ball into the acorn heads. Some will fit just so, which is really handy!

Felted Acorns

3. Make lots and lots of them! You could put them in a jam jar, you could put them in a bowl, you could display them one by one on a shelf.... the possibilities are endless! Ha!

Thursday 15 September 2011

Mushroom Pencil Toppers

I just made this... it was really easy. Used my glue gun to put it all together and they are pearls of an old bracelet!

Wednesday 14 September 2011

Hello!

Hello! Just came on here to have a look round blogland... and I found 3 new followers! A big big BIG welcome to you all!!! I hope you find lots of inspiration and fun here forever and always!! xxx

Monday 12 September 2011

Pumpkin Love!

Pumpkins are sooo cute!!! I haven't really ever decorate my house for fall before *gasp* but you will let me off because it's only my second fall whilst actually having my own home to decorate. I thought it was just christmas decor *even deeper gasp*.  Soooo seeming as everyone else seems to have gone fall crazy and their ideas are just so cute... I had to have a go. I love Autumn alot, I love the colours, I love the weather, I love the leaves, I love the scarves... ooooh I just love it! So here are my lil pumpkins!


You will need:
Orange fabric
Quirky stick
Stuffing of some kind (i used balls of fabric for some and cotton wool for others)
Needle and Thread (dont worry not too much sewing involved)
Scissors
Two Rubber bands or hair ties!


1. Fold your fabric together, right side in, and sew closed as neat or as scruffy as you like. There. That's all you need your needle and thread for!


2. Place stick inside top opening and seal with a rubber band. Most of your stick should be inside the fabric as this will be the stem.


3.Turn this inside out and fill with stuffing. Be sure to stuff it up at the top to make it a nice shape.


4. Once you are happy with the shape secure it with the other band and chop off the excess fabric. Then push the little stub into the fabric so it sits nicely on a flat surface!
How easy was that... yup I went a little mad and made loads. Also made that little decor at the back it says Fall on the bunting!
Friday 9 September 2011

Silhouette Heads Canvases


Ooooh I really hope you guys are going to love these as much as I do... silhouette's seem to be raaaaather big in the crafting world at the moment... so I have made some with a slight twist!

You will need:
Glue gun!
Burlap
Pretty Fabrics
Printer / tracing paper
Scissors
Cardboard / canvas'


1. I got my ladies' heads off Google images. I typed in 'silhouette bun'  and these two lovely ladies were both at the top of page 4! :) Print these two ladies out and start cutting around them. If you have no printer I suggest getting some kind of paper and trace it off the screen (put your paper on the screen and the light from your comp should make it easier!)

2. Cardboard seems to be my major substitute for wood atm....  in these I think it works just as well! So if you want to do it with wood because you have cool power tools and super strong arms then go ahead! Just cut out two squares... I'd do it with a ruler for straightness.

3. Cut out some burlap and glue gun it tightly to the burlap. I stretched it around the back for neatness. Glue on your ladies' heads... that sounds sooo funny :P Make a little fabric flower and and a mini fabric tie with some pretty fabric.  I added a pearl to the centre of her flower. 


I LOVE THEM!!

Wednesday 7 September 2011

Faux Letters

LETTERS! They are everywhere! They are on stands, they are on wall hangings, they are in frames. They add such a homely feel to any room. I love them! I already have quittttte a few,  ha!  Here's my wee lil collection!


Arron got me these for our first xmas together... they had some on our honeymoon and i reaaaaally wanted them!


My lil sis got me these... LOVE THEM!


I got these from a little boutique in a nearby village!


People seem to be making their own wooden ones... So I knew he needed a cheap crafty way to make some... and I came up with these:

You will need:
Glue gun!
Fabric
Cardboard
Scissors


 1. Write out your letters onto the cardboard.... I'd reccomend doing it with a ruler so they are nice and straight.

2. Cut out the fabric roughly half an inch around each letter.

3. Glue your fabric letters onto the cardboard and tuck the excess neatly around the back!

Lovely!


Monday 5 September 2011

Anniversary!

Hello!! I have been away this weekend because it was mine and arrons first anniversary... aw! We had the best time ever. We went to London and stayed friday to monday... such fun! My  mind has been exploding with new ideas and i cant wait to share them! :D

Also... hello there to my new followers! I hope you have the best time ever over here and we have loads of fun!!

Friday 2 September 2011

Guest Post

Today I am posting over at http://somedaycrafts.blogspot.com/... I am making something pretty cute so make sure you hop over! :D